
Sep 3, 2024
5 Clever Wire Tricks all Home Owners Can Do (Electrical Wiring)
When it comes to home improvement, electrical wiring often get overlooked as simple functional elements. However, these versatile materials can be the key to a range of clever, DIY solutions that not only enhance the functionality of your home but also add a touch of creativity. Whether you’re looking to organize your space, improve safety, or add some tech-savvy upgrades, here are five smart tricks every homeowner can do with wire and cable to make their living environment more efficient and stylish.
0:00 – Don’t use wire nuts
1:40 – Best splicing method for lead wire
2:57 – Fix a broken extension cord
5:00 – Work with the grain (connecting to outlets/switches)
7:19 – Ditch wire strippers for this new tool!
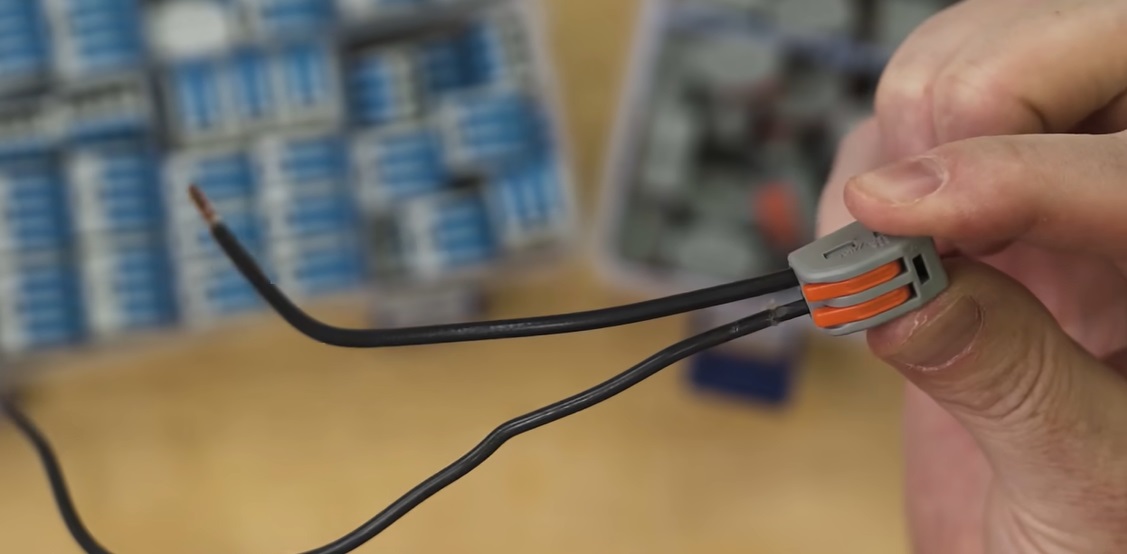
Wago connectors offer several advantages over traditional wire nuts:
1. Ease of Use:
- Tool-Free Installation: Wago connectors are designed for quick, tool-free connections. Simply lift the lever, insert the wire, and lower the lever to secure the connection.
- Reusability: Wago connectors can be reused easily, which makes them ideal for temporary setups or when frequent changes are needed. Wire nuts, once twisted onto wires, can be difficult to remove and often need to be replaced if a connection is undone.
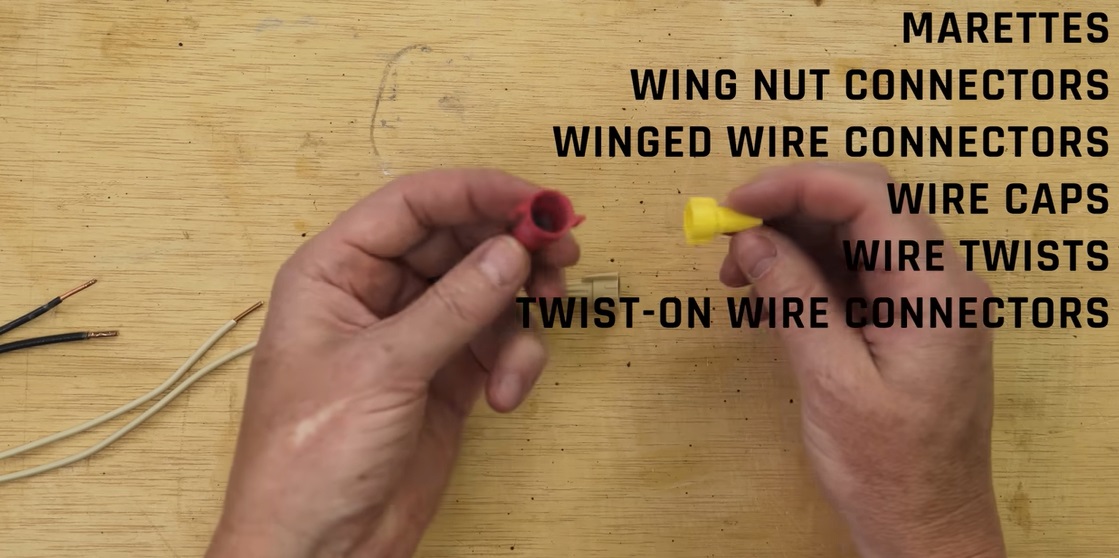
2. Reliability:
- Consistent Connections: Wago connectors ensure consistent and secure connections without the risk of wires coming loose, which can sometimes happen with wire nuts if not twisted correctly.
- No Need for Twisting Wires: With Wago connectors, you don’t need to twist lead wires together before making a connection, which reduces the chance of damaging the wire or creating a poor connection.
3. Versatility:
- Different Wire Types: Wago connectors can handle both solid and stranded wires, whereas wire nuts typically require different techniques for different wire types.
- Multiple Wire Connections: Wago connectors can easily connect multiple wires of different sizes without needing to twist them together first, providing more flexibility in wiring configurations.
4. Safety:
- Reduced Risk of Loose Connections: Wago connectors minimize the risk of loose connections, which can lead to overheating and potential fire hazards.
- Insulation Protection: Wago connectors fully enclose the connection, reducing the risk of exposed wires that could cause short circuits or electrical shocks.
5. Space-Saving:
- Compact Design: Wago connectors are more compact than traditional wire nuts, which can save space in electrical boxes and make wiring in tight spaces easier.
6. Clear Identification:
- Transparent Housing: Many Wago connectors have transparent housings, allowing for visual inspection of the connection without needing to open or disturb it.
These benefits make Wago connectors a popular choice for professional electricians and DIY enthusiasts alike, especially in applications where reliability, ease of use, and safety are paramount.
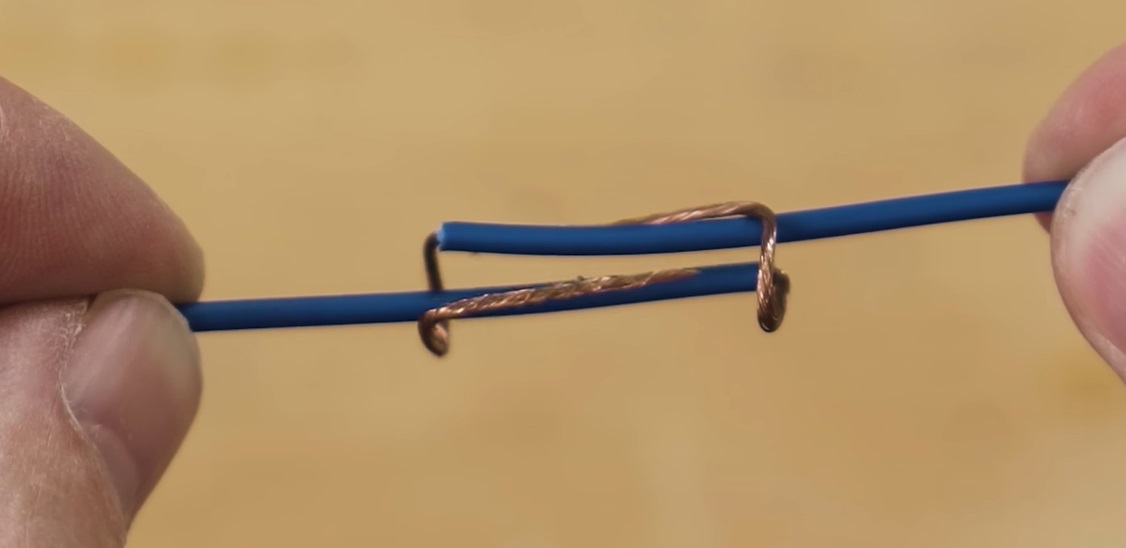
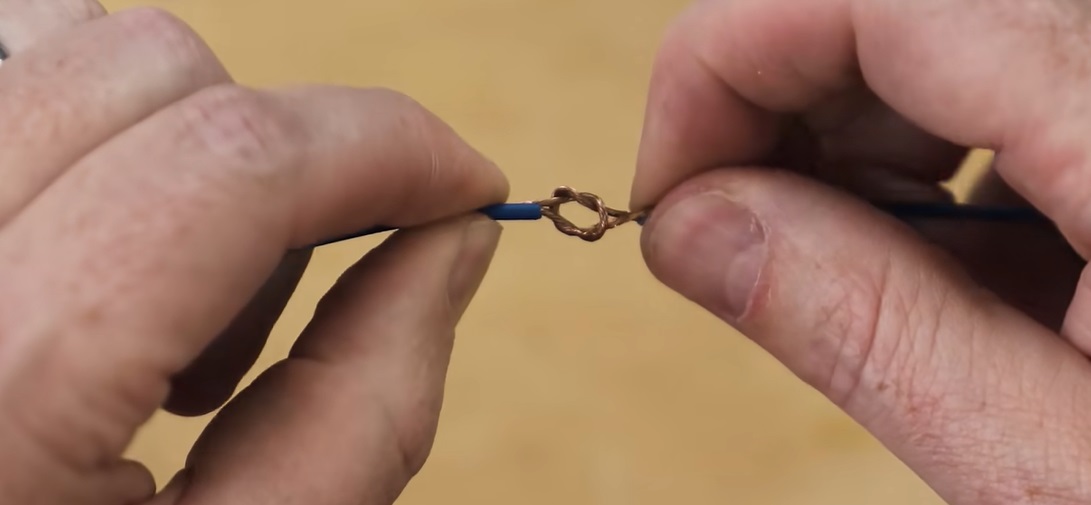
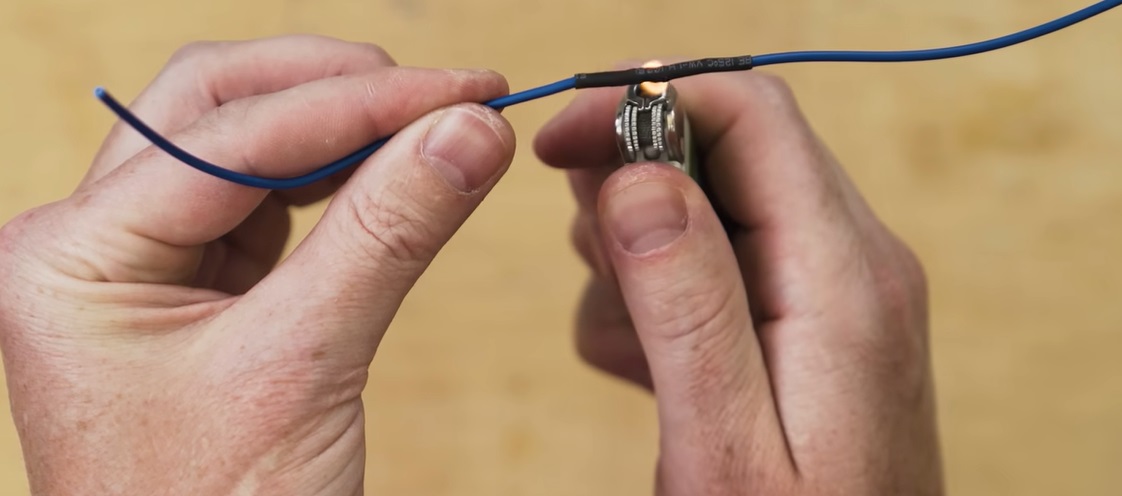
The Best Way to Splice Lead Wires Together
The best method for splicing lead wire with heat shrink tubing involves soldering the wires together and then protecting the splice with heat shrink tubing. This method ensures a strong, conductive, and durable connection. Here’s a step-by-step guide:
Materials Needed:
- Soldering iron and solder
- Heat shrink tubing (sized appropriately for the wire gauge)
- Wire strippers
- Heat gun or lighter
- Electrical tape (optional)
Step-by-Step Instructions:
1. Prepare the Wires:
- Strip the Wires: Use wire strippers to remove about ½ inch (12-13 mm) of insulation from the ends of both lead wires you want to splice.
- Twist the Wires: Twist the exposed wire strands tightly to prevent fraying.
2. Cut and Position the Heat Shrink Tubing:
- Cut the Tubing: Cut a piece of heat shrink tubing that is slightly longer than the exposed wire plus the splice. Ensure it is long enough to cover the entire splice and a small portion of the insulation on both sides.
- Slide the Tubing: Before you start soldering, slide the heat shrink tubing onto one of the wires, keeping it away from the splice area to avoid premature shrinking.
3. Solder the Wires:
- Twist or T-Pair the Wires Together: There are two common methods for splicing:
- Western Union/Inline Splice: Twist the stripped ends together by wrapping one wire around the other in a linear fashion. This method is strong and ideal for inline splices.
- T-Pair Splice: Place the two stripped ends parallel to each other and twist them together, creating a T shape. This method is useful for connections where two wires meet at a junction.
- Apply Solder: Heat the twisted wires with a soldering iron and apply solder to the joint until it flows smoothly over the connection, ensuring good conductivity. Avoid using too much solder, as it can create a bulky joint.
- Cool the Joint: Allow the soldered joint to cool naturally. Avoid moving the wires while the solder is cooling, as this can create a weak connection.
4. Apply Heat Shrink Tubing:
- Position the Tubing: Once the joint has cooled, slide the heat shrink tubing over the soldered connection.
- Shrink the Tubing: Use a heat gun or lighter to evenly heat the tubing until it shrinks tightly around the splice. Ensure that the tubing covers the entire splice and slightly overlaps the insulation on both sides of the splice.
5. Optional: Add Extra Protection:
- Wrap with Electrical Tape: If additional protection is needed, you can wrap the spliced area with electrical tape over the heat shrink tubing for added durability and insulation.
Advantages of This Method:
- Strong Mechanical Connection: The soldered joint provides a strong mechanical bond between the wires.
- Excellent Electrical Conductivity: Soldering ensures a low-resistance connection, which is ideal for maintaining signal integrity or power delivery.
- Protection and Insulation: Heat shrink tubing protects the splice from environmental factors such as moisture, dust, and abrasion while also providing electrical insulation.
This method is widely used in electronics, automotive wiring, and other applications where reliable, long-lasting splices are required.
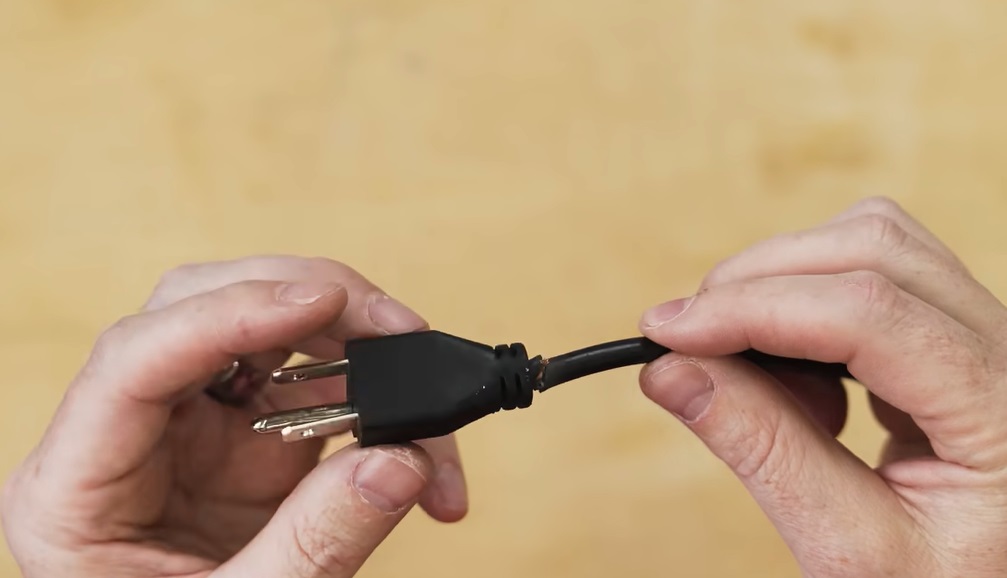
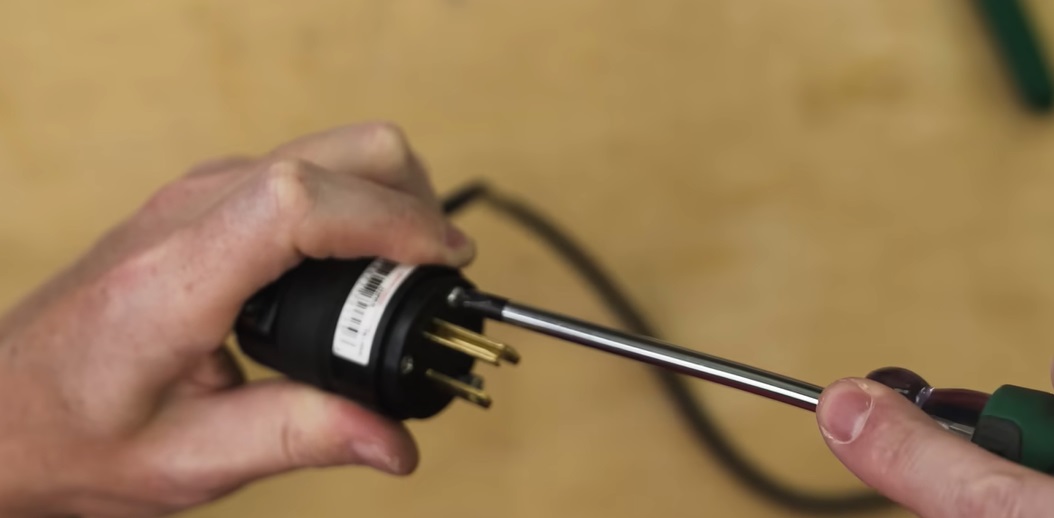
Easily Fix the Broken plug of an Extension Cord in 6 Steps
Fixing a broken plug on a portable extension cord is a straightforward task that involves replacing the damaged plug with a new one. Here’s a step-by-step guide to help you safely replace the plug:
Materials Needed:
- Replacement plug (ensure it is the correct type: 2-prong or 3-prong)
- Wire strippers
- Screwdriver (flathead or Phillips, depending on the plug)
- Utility knife (optional)
- Electrical tape (optional)
Step-by-Step Instructions:
1. Unplug and Inspect the Cord:
- Unplug the Extension Cord: Ensure the extension cord is disconnected from any power source before starting the repair.
- Inspect the Cord: Examine the cord for any additional damage. If the cord itself is damaged, it may be safer to replace the entire extension cord rather than just the plug.
2. Remove the Damaged Plug:
- Cut Off the Old Plug: Using a utility knife or wire cutters, cut off the damaged plug, leaving a clean, straight edge at the end of the cord.
- Strip the Outer Insulation: Carefully strip about 1 to 2 inches (2.5 to 5 cm) of the outer insulation from the end of the cord to expose the inner wires. Be careful not to nick or damage the wires inside.
3. Prepare the Wires:
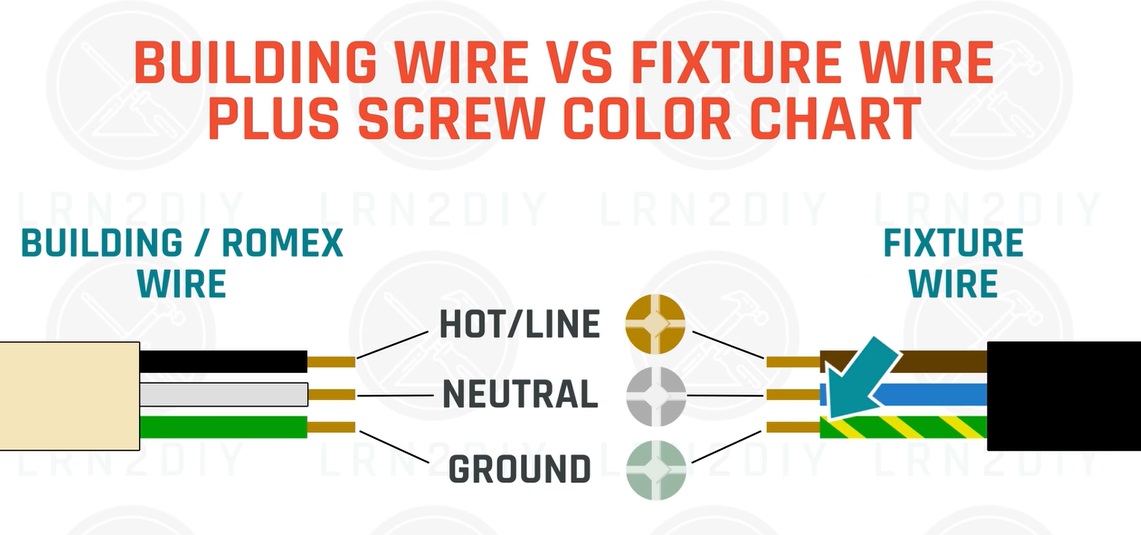
- Separate and Strip the Wires: Depending on the type of extension cord, you will have either two or three wires (black, white, and green). Strip about ½ inch (12-13 mm) of insulation from the ends of each wire.
- 2-Prong Cord: Typically has two wires—one black (hot) and one white (neutral).
- 3-Prong Cord: Has three wires—black (hot), white (neutral), and green (ground).
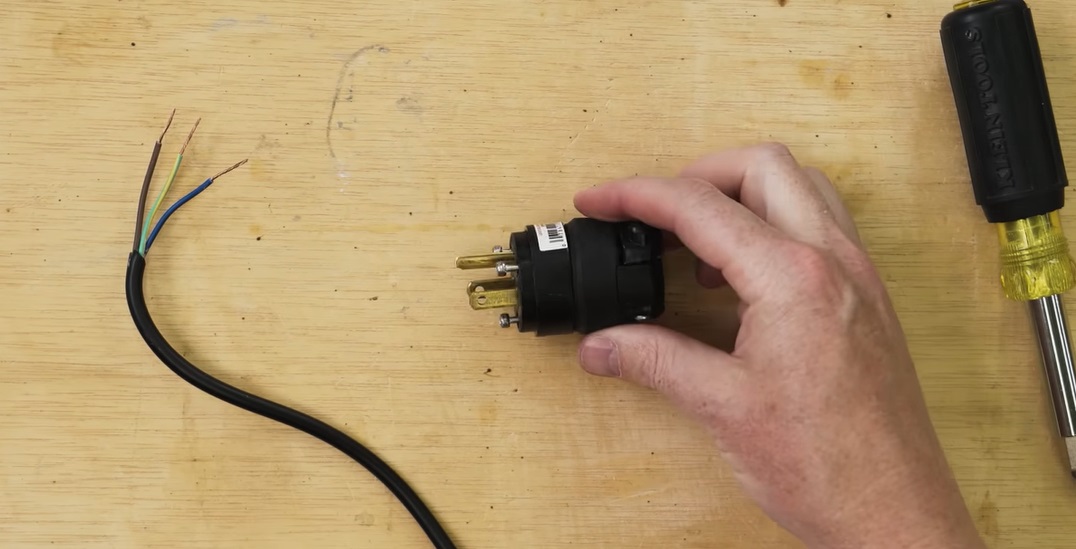
4. Attach the Wires to the New Plug:
- Open the Replacement Plug: Unscrew and open the replacement plug to access the terminals inside.
- Identify the Terminals: Inside the plug, there are typically three terminals:
- Gold or Brass Terminal: Connects to the black (hot) wire.
- Silver Terminal: Connects to the white (neutral) wire.
- Green Terminal: Connects to the green (ground) wire (only for 3-prong plugs).
- Connect the Wires:
- Loosen the screws on the terminals.
- Insert the exposed wire ends into the correct terminals:
- Black (hot) wire to the gold/brass terminal.
- White (neutral) wire to the silver terminal.
- Green (ground) wire to the green terminal.
- Tighten the screws securely to hold the wires in place.
5. Assemble the New Plug:
- Close the Plug Housing: Once all the wires are securely connected, carefully close the plug housing.
- Tighten the Screws: Ensure all screws are tightened securely to keep the plug assembly together.
6. Test the Cord:
- Inspect the Connection: Before plugging in the cord, inspect the plug to ensure it is assembled correctly and that no wires are exposed.
- Test the Cord: Plug the repaired extension cord into a power outlet and test it with a device to ensure it is functioning correctly.
Safety Tips:
- Double-Check Wire Connections: Make sure the wires are connected to the correct terminals to avoid short circuits or electrical hazards.
- Use a Suitable Plug: Ensure the replacement plug is rated for the voltage and current of the extension cord.
- Avoid Overstripping Wires: Strip just enough insulation to make a good connection, but not so much that excess bare wire is exposed.
Replacing a broken plug on an extension cord is a cost-effective way to extend the life of the cord, provided you follow the steps carefully and ensure a secure connection.
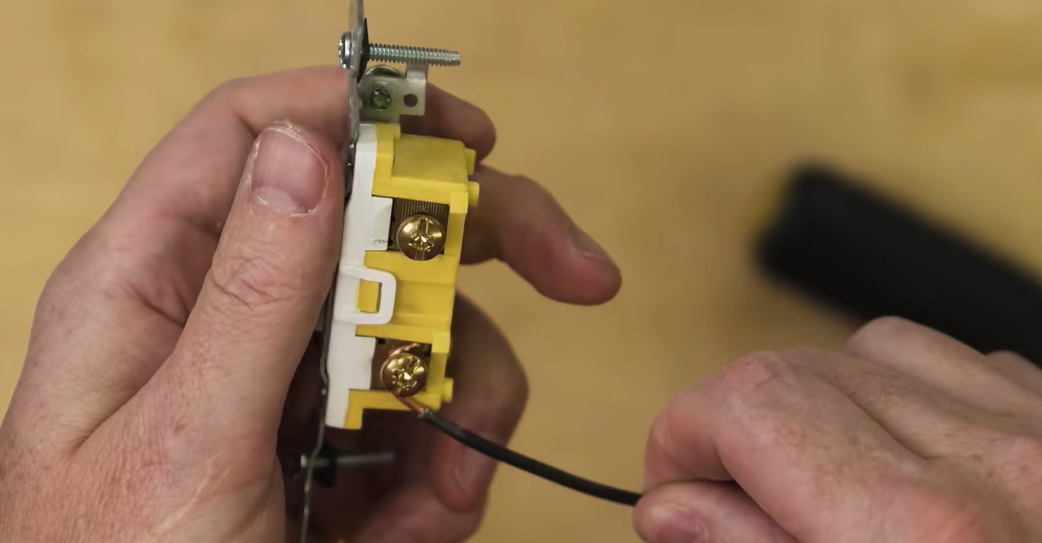
Working with the Grain (Clockwise Loop Romex Wire to Switches)
Making a clockwise loop in the Romex wire when connecting it to a switch offers several important benefits, particularly in terms of safety, reliability, and ease of installation. Here’s why it’s beneficial:
1. Secure Connection:
- Tightening Enhances the Connection: When you make a clockwise loop around the screw terminal, tightening the screw naturally pulls the loop tighter around the screw. This creates a more secure connection by ensuring the wire is firmly gripped under the screw head.
- Prevents Loosening: Because the screw tightens in a clockwise direction, the loop is held in place more effectively. If the wire were looped counterclockwise, tightening the screw could push the wire outwards, potentially loosening the connection over time.
2. Prevents Wire Slippage:
- Minimizes the Risk of the Wire Slipping Out: A properly made clockwise loop reduces the risk of the wire slipping out from under the screw as it’s being tightened. This is particularly important in maintaining a reliable electrical connection, as a loose wire can cause arcing, heat build-up, and potential fire hazards.
3. Even Pressure Distribution:
- Better Electrical Contact: A clockwise loop ensures that the wire’s surface makes good contact with the screw as it is tightened, distributing pressure evenly across the connection. This helps in maintaining a consistent electrical contact, reducing resistance and the likelihood of overheating.
4. Mechanical Stability:
- Prevents Wire Damage: By wrapping the wire around the screw in the direction that the screw turns, you reduce the chance of damaging the wire during installation. The screw’s tightening motion naturally secures the wire, rather than pulling it in a way that could strip or weaken it.
- Improves Durability: The connection is more mechanically stable, meaning it is less likely to come loose over time due to vibrations or other environmental factors.
5. Adherence to Electrical Standards:
- Compliance with Best Practices: Electrical codes and industry best practices recommend making clockwise loops for screw connections. This ensures that the installation meets safety standards and is consistent with professional electrical work.
6. Ease of Installation:
- Simplifies the Process: Making a clockwise loop is intuitive when tightening screws, which makes it easier and quicker to install the wire securely, especially for those who regularly work with electrical wiring.
Summary:
The primary benefit of making a clockwise loop when connecting NM-B cable to a switch is that it ensures a secure, reliable, and durable connection. The loop tightens as the screw is tightened, preventing the wire from loosening or slipping out, thereby reducing the risk of electrical issues such as arcing, overheating, or fire. This method aligns with professional standards and best practices, making it a critical step in safe and effective electrical installations.
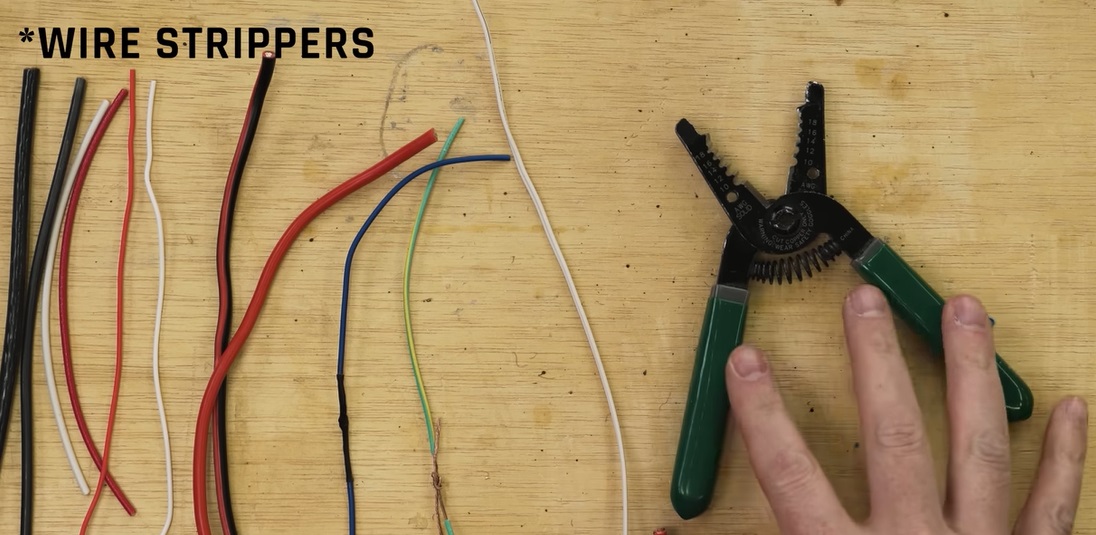
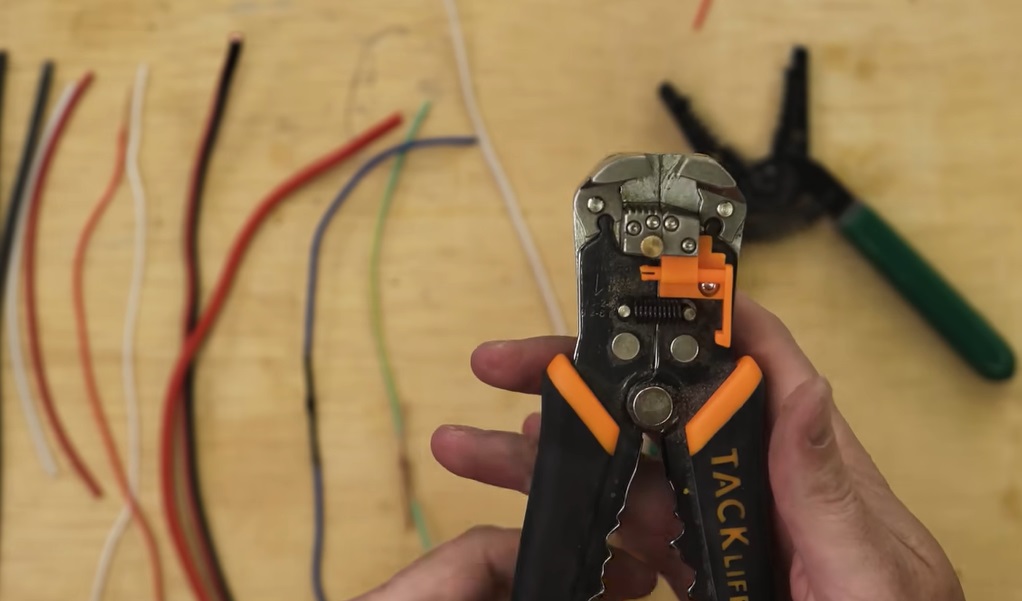
Ditch the old Single Slot Wire Strippers for this Universal Tool
Universal wire strippers offer several advantages over traditional individual slot wire strippers, making them a more versatile and user-friendly tool for both professionals and DIY enthusiasts. Here’s a breakdown of the benefits:
1. Versatility:
- One Tool for Multiple Gauges: Universal wire strippers can handle a wide range of wire gauges (e.g., 10-24 AWG) without needing to switch between different slots. This makes them highly versatile, eliminating the need for multiple tools or frequent adjustments.
- Strips Various Wire Types: Many universal strippers can strip not only solid and stranded wires but also different types of insulation, such as PVC and rubber. Some models also handle coaxial cables, Romex, and even network cables.
2. Ease of Use:
- Automatic Adjustment: Universal wire strippers often feature an automatic adjustment mechanism that self-adjusts to the wire gauge, allowing for quick and accurate stripping. This reduces the time and effort required to strip wires, especially when working with multiple wire sizes.
- Reduced Skill Requirement: With individual slot tools, the user needs to match the wire to the correct slot, which can be tricky, especially for beginners. Universal strippers simplify this process, making them easier to use even for those with less experience.
3. Efficiency:
- Faster Stripping: The self-adjusting feature and lack of need to select the correct slot make the stripping process faster. This is particularly beneficial when working on projects that involve stripping many wires or different types of wires.
- Consistent Results: Universal wire strippers provide consistent stripping without the risk of accidentally using the wrong slot, which can lead to nicked or damaged wires. This consistency improves the overall quality and reliability of the wiring work.
4. Reduced Tool Clutter:
- One Tool, Less Clutter: With a universal wire stripper, you replace the need for multiple individual slot tools, which reduces clutter in your toolbox. This makes your workspace more organized and ensures that you always have the right tool on hand.
5. Precision and Safety:
- Minimizes Wire Damage: Universal wire strippers are designed to minimize the risk of damaging the wire’s conductive core, which can happen with individual slot tools if the wrong slot is used or too much force is applied.
- Improved Safety: By providing a more controlled and precise stripping action, universal wire strippers reduce the likelihood of accidental cuts to the insulation or wire, which enhances safety.
6. Ergonomics:
- Comfortable Design: Universal wire strippers are often designed with ergonomics in mind, featuring comfortable grips and a design that reduces hand fatigue. This makes them more comfortable to use, especially over extended periods.
- Less Hand Adjustment: Unlike individual slot tools, where you might need to constantly adjust your hand position to use different slots, universal strippers require minimal repositioning, which adds to their ergonomic advantage.
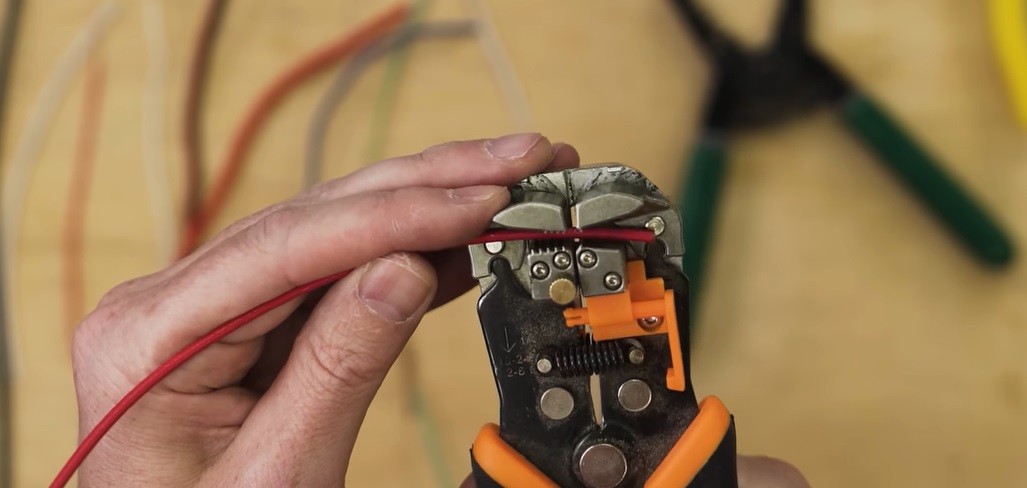
7. Durability and Reliability:
- Higher Build Quality: Many universal wire strippers are built with higher-quality materials and more advanced mechanisms, making them more durable and reliable over time compared to basic individual slot tools.
- Longevity: The reduced wear and tear on both the tool and the wires it strips contribute to the longevity of both the tool and the electrical work it performs.
Summary:
Universal wire strippers offer significant advantages over traditional individual slot tools, including greater versatility, ease of use, efficiency, and safety. They reduce the need for multiple tools, minimize the risk of wire damage, and provide consistent, high-quality results. Their ergonomic design and precision make them an essential tool for anyone working with electrical wiring.


